
Yes, you can watercolour on canvas, but only if you make the canvas absorbent first with watercolour ground or buy a pre-primed watercolour canvas. Standard gesso-primed canvas is too sealed, so the paint beads, pools, and slides off instead of settling into the surface.
You've probably got a stretched canvas on the table, a brush in hand, and that hopeful feeling that watercolor might give you a softer, more luminous result than acrylic. It can, but the surface changes everything, and the final finish matters just as much as the painting itself.
The Short Answer on Watercolour and Canvas
A student once brought in a lovely painting on a standard acrylic-primed canvas and asked why the sky had turned into tiny puddles. The answer was simple. Watercolour can work on canvas, but only on a surface that has been made absorbent first.
That is the part most beginners miss. Watercolor was developed for absorbent supports such as paper, vellum, silk, and wood, not for sealed canvas, and its art history is tied to those earlier surfaces. Accounts of watercolor history trace it through manuscript illustration and early Western practice, then into the later tradition that made the medium familiar to modern artists, which helps explain why canvas is a later adaptation rather than the default historical context.
What you need before you start
If you want the paint to behave, you need one of three things. A stretched canvas coated with watercolour ground, a canvas board or panel prepared the same way, or a pre-made watercolour canvas that already has the right absorbent layer. Standard gesso is not the same thing. Gesso seals the surface, while watercolour ground is made to let the wash sit and move more like it does on paper.
Practical rule: if water hits the canvas and sits on top like it would on a raincoat, the surface still is not ready.
That difference shows up right away at the easel. On paper, paint usually sinks in and settles. On canvas, even when it has been prepared correctly, the texture is less forgiving, so it helps to plan your composition, work with lighter pressure, and accept that the surface will not reward endless correction. The canvas can also change the way a wash breaks across the weave, so what looks smooth in theory may dry with more texture than you expected.
If you only need the short version, here it is. Yes, you can watercolour on canvas. No, ordinary gessoed canvas will not behave like watercolor paper, and the difference matters from the first wet stroke to the final sealed surface.
How Canvas Changes Watercolor Behaviour
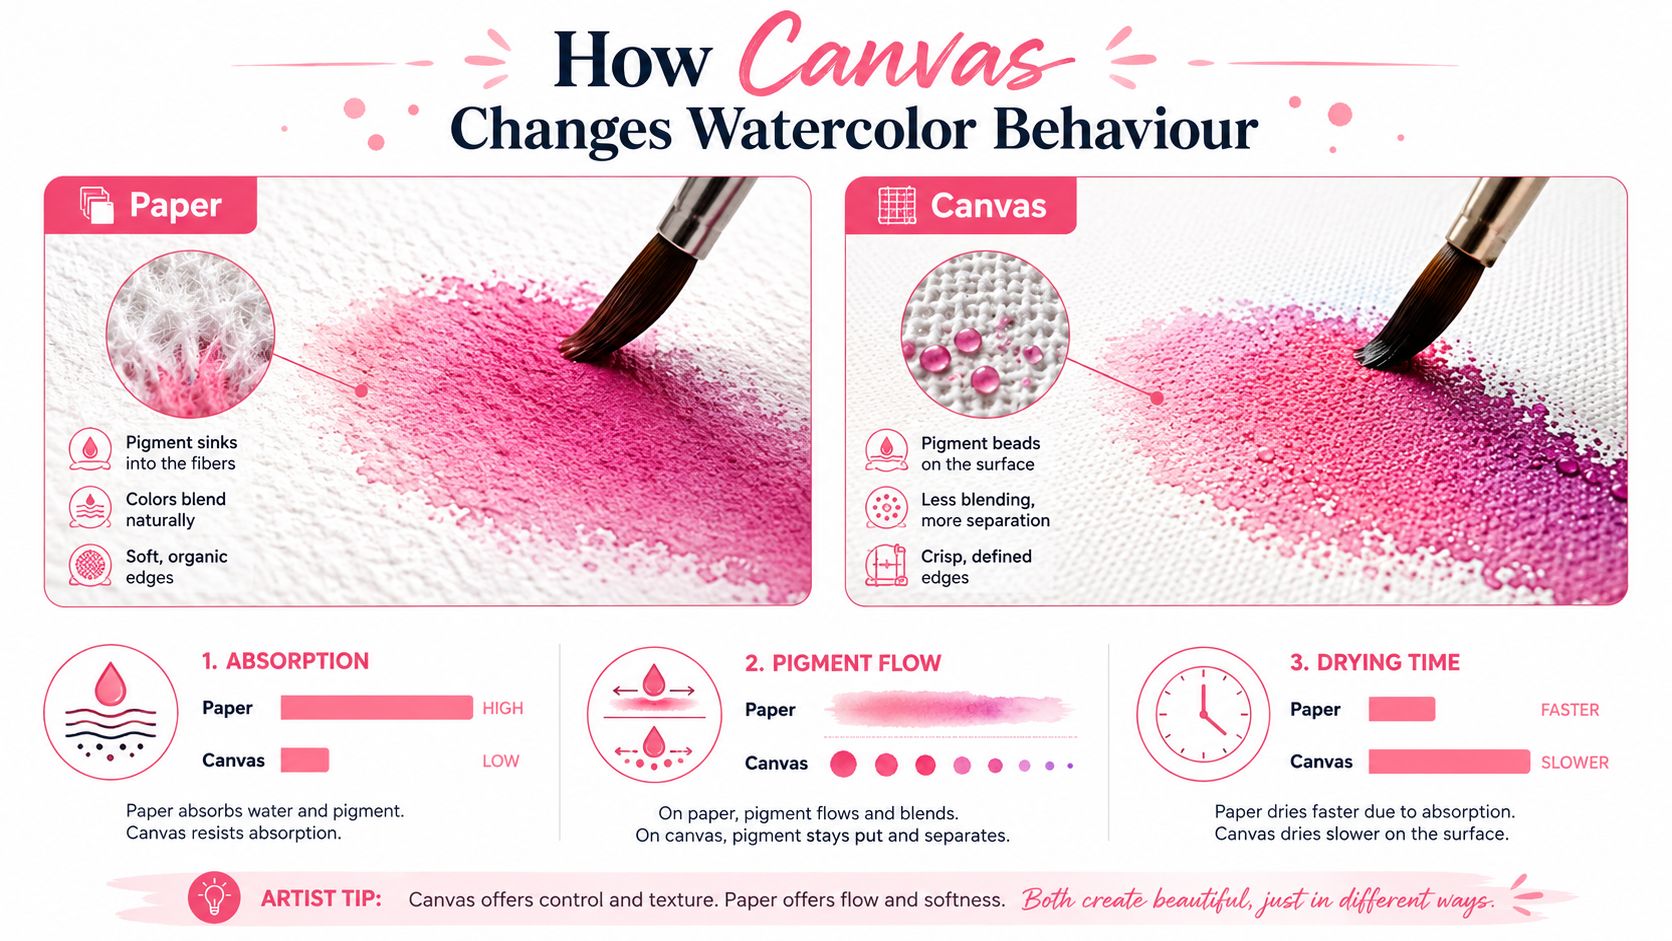
Watercolor on paper feels familiar because the paper helps the pigment travel. The fibers pull the liquid inward, so edges soften and washes bloom naturally. On canvas, the surface behaves more like a platform than a sponge unless you've added an absorbent ground first.
Absorption changes the whole rhythm
That difference matters immediately. On paper, a wet wash has a little time to merge and feather. On canvas, even a prepared one, the texture can break the wash into smaller pockets, which can make a gradient look more textured than silky.
Britannica notes that watercolor was often used for tinting drawings or with opaque body color before the English school helped shape the modern independent tradition, and the Met Museum notes that broad popularity for scenes of nature and genre scenes didn't arrive until the end of the eighteenth century Britannica on watercolor practice. That history mirrors the material reality. The medium was built around surfaces that accepted water, so canvas always asks for a compromise.
The artist who expects paper behavior on canvas usually blames the paint. The real issue is the surface.
Layering works, but it asks for more commitment
Lifting is also different. Paper often gives you a second chance, especially with light washes. Canvas tends to hold onto the first layer more firmly once the ground has grabbed it, but that doesn't mean it behaves like acrylic. It still reactivates more easily than a permanent medium, and that's why later touchups can get muddy if you overwork them.
A good mental model is this, paper is a soft bed, canvas is a textured tray. The wash can still land on it, but it won't disappear into the fibers the same way, so your brush decisions show faster.
What that means for your style
If you like loose florals, simple skies, abstract color blocks, or paintings where the texture becomes part of the look, canvas can be a very satisfying support. If your style depends on soft glazing, repeated lifting, and tiny corrections, paper will usually feel easier. That's the tradeoff, and it's worth accepting before you start rather than fighting it midway through a wet wash.
Choosing the Right Canvas and Primer
The good news is that you do not need unusual materials to start. You need an absorbent layer that can take watercolor in a controlled way, and you need to choose whether you will build that surface yourself or buy it ready-made. The option that feels familiar is often the one that performs less well, so it helps to judge by behavior rather than by habit.
Watercolour ground versus gesso
Watercolour ground is an absorbent coating made to imitate the tooth and liquid uptake of watercolor paper. It gives the paint a place to sit and move, which is why it is the right product for this job. Acrylic gesso does the opposite. It seals the support, which is useful for oil or acrylic, but not for watercolor unless you want the paint to bead and slide.
Historical watercolor materials developed on paper, vellum, silk, and wood before canvas became part of the conversation. The logic behind watercolour ground is a modern workaround for an older medium, as noted in historical support history. Keep that idea in mind. You are not turning watercolor into something else, you are giving it a surface it can work with.
Your main options
| Option | Absorbency | Texture | Cost | Best For |
|---|---|---|---|---|
| Standard stretched canvas plus watercolour ground | High when properly coated | Can be smooth or lightly textured | Moderate | Artists who want flexibility and custom sizing |
| Canvas board or panel plus watercolour ground | High when properly coated | Usually firmer and flatter | Moderate | Students, smaller works, travel setup |
| Pre-made watercolour canvas | Ready to use | Depends on brand | Usually higher upfront | Fast starts and first experiments |
The right choice depends on how much control you want over the surface. If you like adjusting each part of the setup, start with a standard canvas and apply your own ground. If you want to spend more time painting and less time preparing, a pre-made watercolour canvas is easier.
Best habit: test the surface with a small wet brush before you paint the actual subject. If the water sits in a useful way instead of sliding around, you are ready.
For a first attempt, many artists do better with a canvas board or panel. It feels firmer under the brush, and that firmness helps when you are still learning how much water the surface will hold.
Preparing and Painting Your Watercolour Canvas
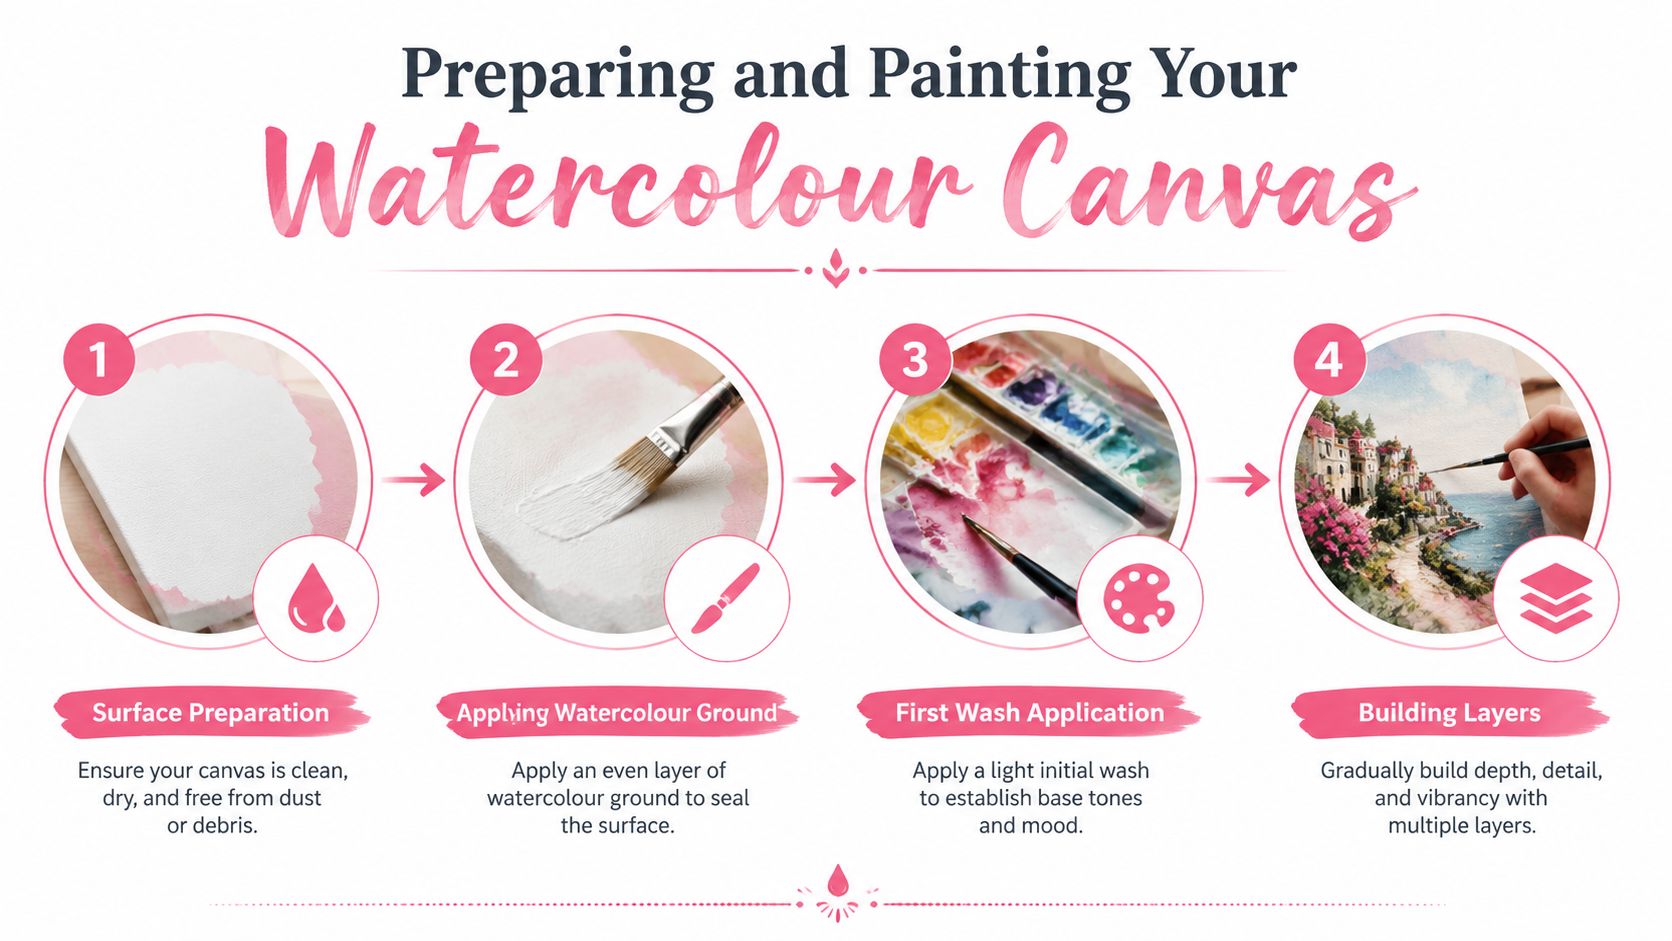
Preparation is where most problems are prevented. If the ground goes on unevenly, the painting will show it. If the surface is still under-cured, the wash can act sticky or patchy. A patient setup saves you from trying to rescue the piece later with a dry brush and crossed fingers.
Start with an even absorbent layer
Apply the watercolour ground in smooth, even coats. Don't rush the process, because thin spots create inconsistent absorption, and inconsistent absorption creates streaks. If you're testing a new product or canvas, let a small wet brush do the checking before you start the actual image.
The working habit that helps most is simple. Paint with a little less water than you'd use on paper, then build strength through repeated passes rather than flooding the surface immediately. Soft brushes help, because they can work pigment into the weave without roughing up the layer.
Paint in a way that suits the surface
Wet-on-wet still works, but it's less predictable, so keep your first wash loose and accept where it moves. Wet-on-dry layering is often the cleaner choice for details, because the surface texture can disrupt tiny blending moves if you keep brushing too long. A spray bottle nearby helps you keep a passage open for a bit longer without drowning it.
Work the first layer like it matters most, because on canvas it often does.
That doesn't mean you can't build depth. It means your planning should happen before the brush touches the canvas, not after. Sketch the composition clearly, decide where your lightest passages will stay, and avoid depending on heavy lifting for major corrections.
Let the texture help instead of fighting it
Canvas weave can add a pleasing grain to skies, petals, and background washes. If you lean into that texture, the painting can feel more tactile than paper work. If you want smooth realism, you'll need a finer ground and a more controlled hand.
The video below shows the surface preparation and painting rhythm in a compact way.
Common Problems and How to Fix Them
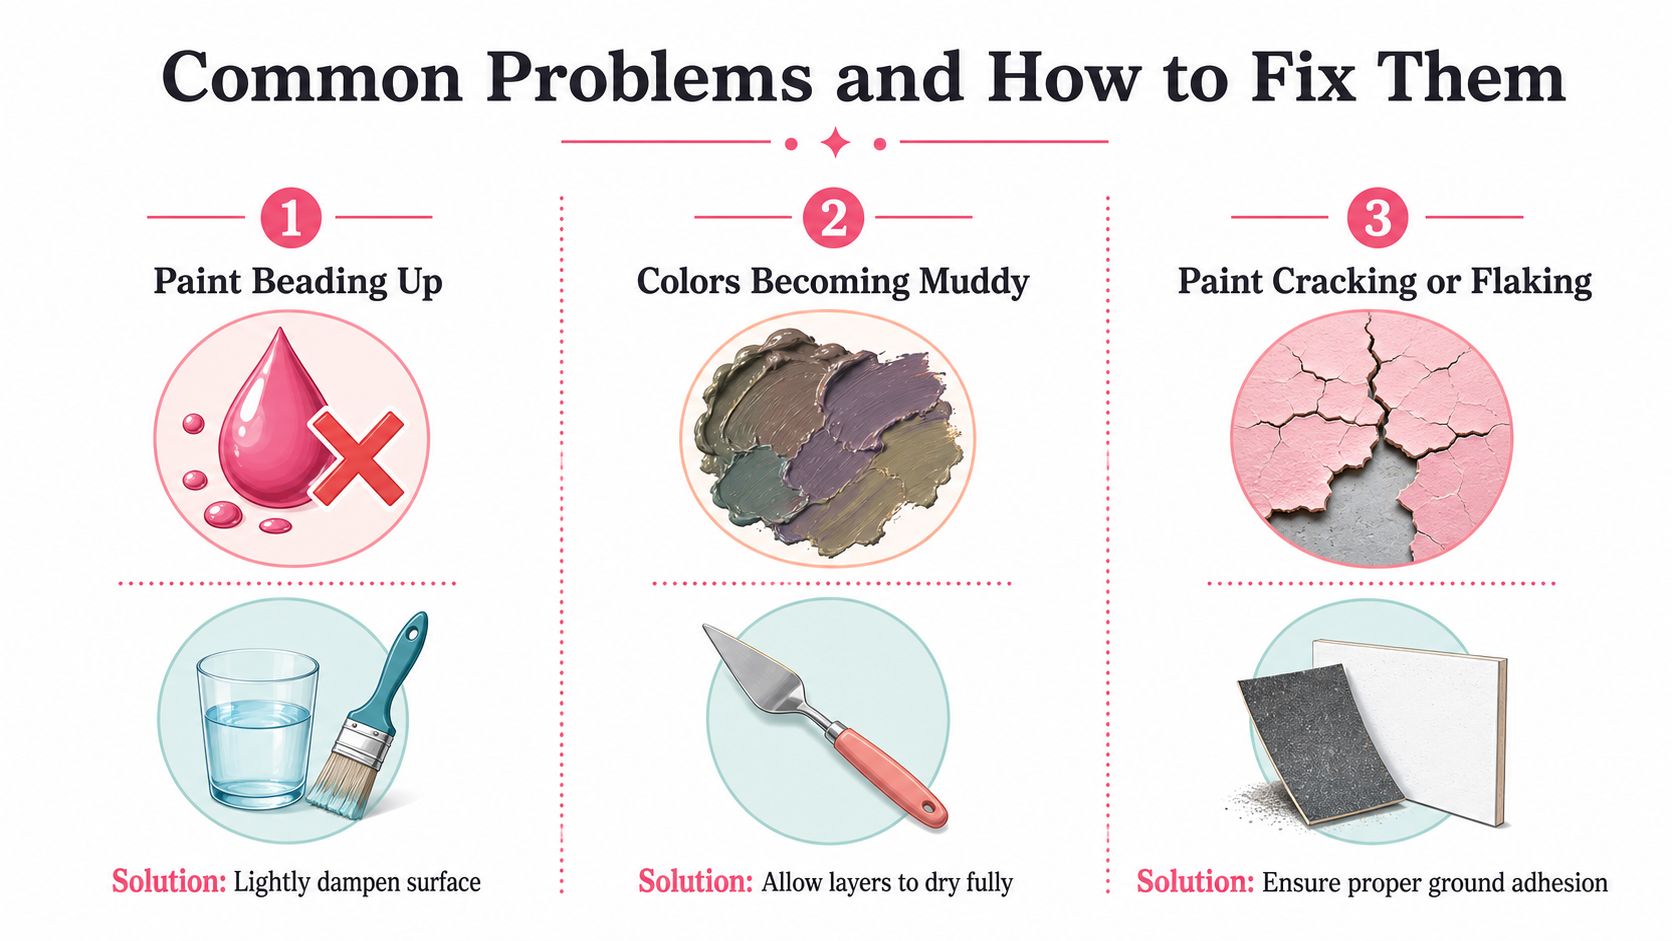
Even when the surface is prepared correctly, watercolor on canvas can still surprise you. The issues are usually practical, not mysterious. If you know what caused them, you can adjust quickly instead of assuming the whole experiment failed.
When the paint beads up
Beading usually means the surface is still too sealed, too slick, or not fully cured. It can also mean the ground was applied too thinly in places, so the liquid is finding uneven resistance across the canvas. The fix is straightforward. Let the ground cure fully, then add another even coat if needed.
When the colors look dull or muddy
Duller color often comes from overworking the same passage or putting down too much water for the amount of pigment. On canvas, the texture can also scatter the paint a little, which softens the clean brilliance you may be used to on paper. Use a stronger pigment mix, let layers dry fully, and stop brushing once the passage has settled.
When lifting becomes difficult
Paper habits can mislead you. Once watercolor has grabbed into the absorbent ground, it can be harder to erase cleanly than on paper, especially in detailed areas. If you need to correct, lift gently with a damp brush or a barely moist cloth before the layer sets too far.
Useful habit: make corrections early. Canvas rewards prompt decisions more than repeated reworking.
When cracking or flaking shows up
Cracking or flaking usually points to poor adhesion, incompatibility in the surface layers, or a finish that wasn't suited to the piece. It can also happen if the paint layer is too stressed after drying. The practical fix is to start with a properly prepared absorbent surface and avoid piling on thick, unstable layers.
The important part is not to panic. Most canvas failures come from surface prep or finishing choices, not from watercolor itself. If you control those two points, you give the painting a much better chance of staying intact.
Sealing and Displaying Watercolour on Canvas Without Glass
This is the part most guides leave vague, and it's the part artists care about after the paint dries. Traditional watercolor is usually framed behind glass because the surface can stain, wrinkle with humidity, and re-dissolve with water. If you want to display watercolor on canvas like a finished panel, you need to think about protection from the start watercolor display context.
Build protection in layers
Independent guidance says watercolor on canvas generally needs a spray varnish or other protective topcoat because the paint can lift easily, and brush-on varnish can smear the surface. The more cautious approach is to treat finishing as a three-part process. Lock the pigment down, create a barrier, then add the final display coat.
A workable sequence is fixative first, then an isolation coat, then a UV-protective varnish. The fixative helps reduce smearing. The isolation coat gives the varnish a removable layer to sit on. The final varnish protects the piece and makes glass-free display more realistic.
Choose the finish with the painting in mind
Sprayed products are usually gentler on watercolor than brush-on options because they're less likely to disturb the paint surface. Brush-on varnishes can work, but they demand a very careful hand. If you brush too hard, you can lift pigment, especially on more delicate passages.
Practical rule: test the finish on a scrap sample before you touch the finished painting.
That test matters because a varnish changes more than protection. It can alter sheen, deepen colors, or make a matte surface look more saturated. If your painting depends on subtle pale passages, use a finish that preserves that delicacy rather than one that forces a shiny look.
Display without glass, but with care
Once sealed, you can mount or frame the piece without glazing, which is one reason some artists choose canvas in the first place. Still, the work should be handled like a finished artwork, not like an indestructible wall object. Keep it away from water, wipe dust gently, and let every layer dry as directed before hanging.
Recommended Materials and Your Starter Checklist
A clean first setup is easier than a crowded shopping list. You only need a few well-matched materials, and the biggest decision is still the surface. If you choose the right ground, the rest of the process becomes much less frustrating.
What to look for
For the canvas, choose a stretched canvas, panel, or board that feels stable and isn't overly slick. For the surface coat, buy a watercolour ground made for absorbent painting, not regular gesso. For the finish, use a spray fixative and an archival varnish system that's intended for delicate paint layers.
If you want a color-planning tool before you start, ColorBestie includes a palette generator that can help you preview combinations before you commit paint to the surface. That's most useful for choosing a scheme, not for painting itself.
Starter checklist
- Canvas or panel: pick a size you won't mind testing on first.
- Watercolour ground: enough to cover the surface evenly.
- Soft brushes: use them for washes and light layering.
- Palette and water container: keep them simple so you can focus on the surface behavior.
- Spray bottle: handy for keeping certain passages workable a little longer.
- Fixative and varnish: for sealing after the painting is completely dry.
- Lint-free cloths: useful during the finishing stage and for clean handling.
The historical thread is useful here. Watercolor began on absorbent supports long before canvas became a practical option, so using it on canvas is really a modern extension of a much older medium. That makes it less of a gimmick and more of a material adaptation, as long as you respect the surface.
If you want help choosing a palette before your first watercolor canvas experiment, try ColorBestie for quick color previews, then compare your options on ColorBestie before you start painting.

