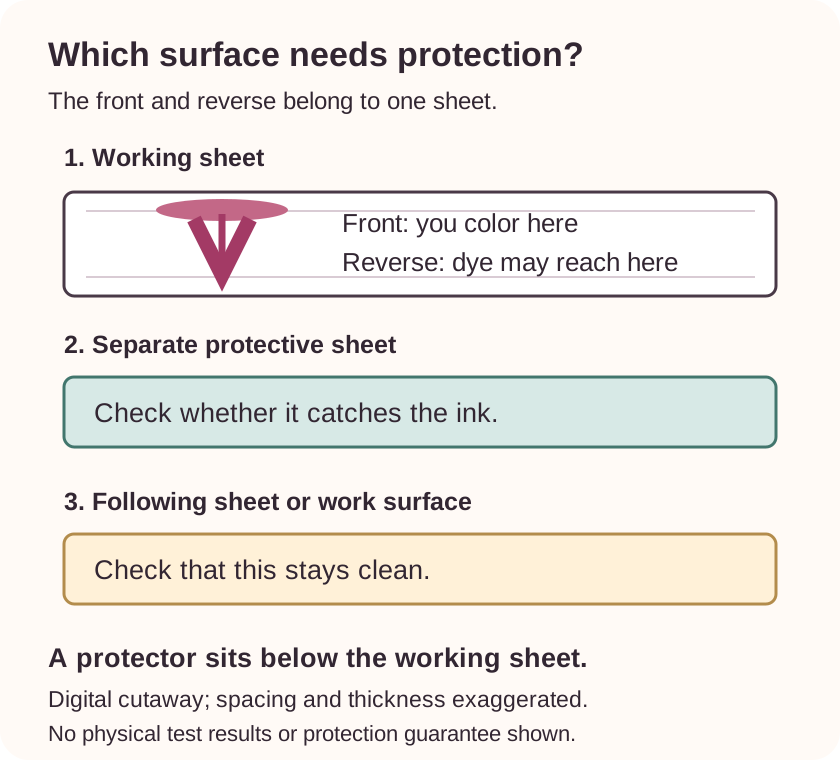
A protective sheet can catch alcohol-marker ink before it reaches the next drawing, but it cannot keep the reverse of the sheet you are coloring clean once dye has passed into it. If the picture or quotation on that reverse matters, test the exact paper and marker first, and choose a different medium if the test marks it.
This distinction answers a coloring beginner whose backing paper protected the next drawing while quotations on the reverse were still damaged. The useful first decision is which surface you need to preserve.
Separate the back of this sheet from the next page
Open your book and identify three things: the front you are coloring, the reverse of that same sheet, and the separate sheet underneath. A protector goes between the working sheet and the following one.
Copic explains that its dye ink penetrates paper, with the amount of bleeding depending on the paper. Its recommendation to place scrap paper underneath protects the surface below. It does not turn the working sheet into a barrier.
| What needs protecting? | What to check or change |
|---|---|
| The next drawing or table | Place a clean protective sheet directly behind the working sheet and check that it catches the ink in your trial. |
| A drawing or quotation on the reverse | Check the reverse of a representative sample. If it stains, use a medium that passes your test or choose a single-sided practice page. |
| The printed outlines on the front | Test the printed lines as well as the blank paper. A clean reverse alone does not establish that the line ink is compatible. |
Set up protection before coloring
Crayola recommends a thick scrap-paper blotter beneath the artwork, suitable paper and light ink application. Begin with a clean sheet large enough to cover your entire working area. Check beneath it during your trial; add or change protection if ink reaches beyond it.
- Lift the working sheet. Put the protector immediately beneath it, rather than several drawings further down the book.
- Cover the full area you will color. Check the position near the binding and the outside corners. Reposition it when you move to another page.
- Inspect both faces of the protector. Before putting it beneath a new page, check for wet or transferable marks. Use a clean replacement if you are unsure.
- Recheck when adding layers. A protector that caught one light pass still needs checking when you use more ink.
If you use the reusable protector supplied with a marker set, follow its maker's cleaning and use instructions. This guide does not establish that an arbitrary plastic, rubber or coated sheet is suitable for your ink. You still need to inspect the next sheet and work surface in the trial.
Run a small paper-and-marker check
Use a spare sample of the same paper or the book's designated test page if available. Different paper provides a comparison, not proof that your book will perform the same way. If the only available test is on a page you value, decide whether you are willing to risk a mark before starting; a tiny test is still permanent if it stains.
Place a clean protector beneath the sample and another clean sheet below that. Write down the marker code and the paper or exact book edition. Make two separate patches with the same marker:
- One pass: color a small patch using your usual light touch.
- Intended layers: color another patch as you actually plan to use the marker, including any repeated applications. Record how many passes you made rather than adding ink until the paper fails.
- After drying: examine the front, turn the sample over, then inspect the protector and clean sheet below. Record each surface separately.
Repeat for the colors you intend to use. A satisfactory result with one marker and one pass does not certify every ink or a heavily layered area. These are instructions for your observations; no physical results have been supplied or claimed by ColorBestie.
Record: marker/code ______; paper or book/edition ______; protector ______; intended passes ______; date ______.
| Check after drying | One pass | Intended layers |
|---|---|---|
| Front: color and printed lines | ________________ | ________________ |
| Reverse of working sheet | ________________ | ________________ |
| Protector: top and underside | ________________ | ________________ |
| Clean sheet below protector | ________________ | ________________ |
Write the decision beside the sample: use this combination, keep it for single-sided pages, or try another medium or paper. Keep the marked sample so you know what that decision was based on.
If the book is printed on both sides
When your trial leaves an unwanted mark on the reverse, a backing sheet does not solve the part of the problem you care about. Colored pencils or crayons offer a way to color without adding liquid marker ink. If you prefer water-based markers, test those too rather than assuming that every pen will preserve thin paper.
You can also keep alcohol markers for an original single-sided printable. The free ColorBestie coloring pages give you a separate place to practice; the paper you print on still needs checking. A blank reverse avoids sacrificing a second illustration, while a protector helps safeguard the sheet or table underneath.
Paper weight alone is not a guarantee. Copic's paper guidance distinguishes surfaces with different bleeding and blending behavior, and Ohuhu notes that paper changes how its dye colors appear. Treat a weight or a label such as marker paper as a candidate to test with your own supplies.
For the broader choices involved in paper weight, finish and page layout, see the existing coloring-book paper guide. Use your sample record to make the final choice for this particular book.
If the reverse is already marked
A protector cannot undo that mark. Decide whether to continue on the front, keep the reverse as it is, or use a different medium on the remaining pages. Avoid treating a favorite bound page as the place to experiment with removing dye.
Check the condition of the page and protector before closing the book. A reader in another beginner discussion reported marks appearing after storage. That report does not identify a chemical cause or prove a brand defect. If you see a delayed change, record the marker, paper and timing, photograph the affected surfaces and ask the manufacturer for guidance. Keep a clean separator where you observed transfer while checking whether it recurs.
Keep the useful result beside your markers
Make a code reference with the free ColorBestie Swatch Chart Maker and attach your four-surface check to it. The tool produces blank printable A4 charts without an account or credits; it cannot determine which paper will resist your ink.
Once the material choice works for your page, explore a color direction in ColorBestie. A digital preview can help with color ideas, but it cannot preserve a reverse-side illustration or predict physical ink transfer.
Before your next full page, identify which surface must stay clean and complete one small check with the actual marker and paper.