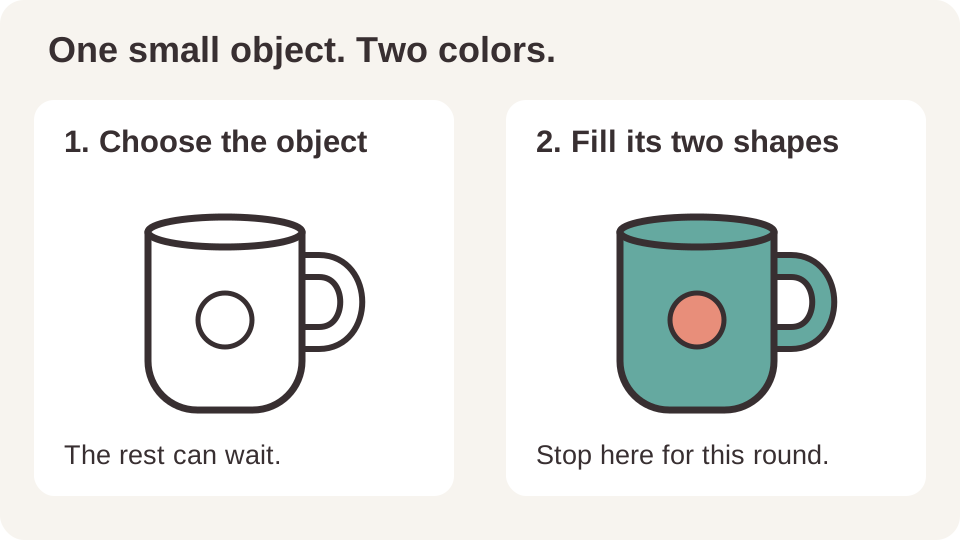
Pick one small object on your coloring page, choose two colors you already own, and finish that object before planning the rest. A cup with a little badge, a flower with a center, or one leaf and its stem is enough. Leave the background and all the other objects for later.
If you keep opening a favorite book and closing it without making a mark, try the exercise below. Its finish line is one colored object. Shading, blending, highlights and a finished page are optional next projects.
Choose an object with a clear edge
Find an object you can identify without deciding the whole scene: one cushion, one mushroom cap and stem, or one mug. Choose a shape large enough for the tool you are using. A tiny intricate flower is a poor starting choice if your marker tip cannot comfortably fit its petals.
Write a concrete finish line before choosing colors: “Fill this mug and its small badge.” Avoid goals such as “make this page beautiful,” which do not tell you where to stop. For this exercise, stop when your chosen shapes have their intended flat fills.
If you would rather begin on a separate sheet, choose an original design from our free printable coloring pages. PDF and PNG downloads do not need an account. Use your own drawing or a download whose terms allow your use; you do not need to copy a publisher’s illustration.
Give two available colors one job each
- Color A fills the main shape. Choose a color you would enjoy seeing on that object.
- Color B fills one separate detail. Use it for the mug’s badge, the flower center, or the mushroom stem. Keep the two fills in their own shapes; no blending is required.
- Put the remaining colors aside. You can choose colors for the rest of the page after this object is done.
For example, make the mug teal and its badge coral. These are the colors of the original digital drawing below, not tested marker pairings or required supplies. Pink and brown, green and yellow, or two other colors from your pencil case can serve the same two jobs.
Do you only have one color you want to use? Fill the main shape and leave the small detail white. Two colors are a convenient limit for this exercise, not a minimum you must buy or reach.
Make a small mark before filling the object
Make one small swatch of each chosen color on a spare piece of the paper you intend to use, where available. Label each with its pencil name or marker brand, series and code. Compare the real marks before filling the object. Our blank swatch chart provides empty boxes if you want a reusable record, but two hand-drawn boxes do the job here.
With alcohol markers, put clean protection directly behind the working sheet; if its reverse has artwork or text you value, test on matching spare paper first or choose a practice page, because backing does not protect the reverse of that same sheet. See our bleed-through guide and Copic’s guidance on backing and paper.
If choosing the pair is the part keeping you stuck, the free Palette Generator can suggest colors from a supported alcohol-marker collection. Select your exact set and, if needed, the codes you own. Take two candidates from one result, then check them on paper. The tool gives up to five suggestions; you do not have to use all five. Screen swatches do not promise exact ink colors or successful physical blends.
Fill the chosen object, then pause
- Fill the main shape with Color A using a familiar, simple flat fill.
- Fill the separate detail with Color B, or leave it white if you chose the one-color version.
- Put the tools down and check your written finish line. If both intended shapes are filled, this round is complete.
A flat-colored mug can stay flat. You do not need to add a shadow because a tutorial or another person’s finished page has one. If learning a particular marker stroke is your next task, use our alcohol-marker beginner guide separately rather than turning this first object into every exercise at once.
If a color looks different from what you expected, note what you would change on the next object. A line crossed or a color you like less does not mean you must recolor the whole shape immediately. You can also stop for the day with that one object completed.
Your first-object worksheet
Copy these prompts onto spare paper. Fill them with your own choices; the blanks are not results from a test.
| Decision | Your entry |
|---|---|
| Page and chosen small object | ______ |
| Main shape: Color A and its label | ______ |
| Separate detail: Color B, or paper white | ______ |
| This round is done when… | ______ |
| One thing noticed in the real swatches | ______ |
| Next choice: stop, repeat, or another object | ______ |
A filled example might read: “Mug on the left; teal body; coral badge; done when those two shapes are filled; coral looks darker than the cap; repeat teal on a second mug next time.” That is an illustrative note, not an observed ink result.
Choose the next step after this one
Keep the two colors and repeat them on a similar object, choose one new object, or leave the page as it is until your next session. Decide only that next step. You can keep the background white while the rest of the page takes shape.
If you later want a colored reference for the whole page, our guide to previewing your own coloring page explains the optional ColorBestie app workflow. AI may alter details and cannot predict your exact paper result. Generating an image uses your available preview allowance or credits; see current credit rules. No preview is needed to complete this exercise.
Sources and the question behind the exercise
The “Afraid to start” discussion in r/Coloring raises the starting problem. This worksheet, stopping rule and mug diagram are original ColorBestie material. Illustrator Johanna Basford’s core principles encourage enjoying coloring without requiring perfect lines or elaborate supplies. The linked ColorBestie tool pages document their features and limits. This guide offers a practical art exercise, without promising a particular finished result.